

I Built a Full GoPhish + Azure Phishing Simulation Platform — Here's Exactly How

A complete, no-fluff technical walkthrough — from zero infrastructure to a live, multi-region phishing drill hitting larger set of employees across multiple countries.
--------------------------------------------------------------------------------------------------------
1. What Is This and Why Are We Building It?
Alright, let's kick things off. What exactly is a phishing simulation drill?
In plain English:
it's a controlled, authorized test where your own security team sends fake phishing emails to employees — just to see who clicks, who submits credentials, and (hopefully) who reports it. I know it sounds a bit sneaky, but honestly it's one of the most effective things you can do for security awareness training.
Why?
Because it measures real behaviour under real conditions — not just whether someone sat through a training video.
For this, we used GoPhish — a free, open-source phishing framework written in Go. It gives you a slick web dashboard where you can create email templates, build landing pages, manage target groups, launch campaigns, and watch results come in live. Oh, and it has a clean REST API. It's pretty great.
For our project specifically, we needed something that could:
Send around 5000 phishing simulation emails across multiple countries
Host a convincing landing page where employees land after clicking the link
Track who opened, who clicked, and who actually submitted data
Redirect to an awareness/education page after someone interacts with it
Run on proper enterprise-grade infrastructure (Azure) — not a home server
Pass SPF, DKIM, and DMARC checks so the emails actually land in inboxes
One thing before we go any further — and this is non-negotiable: phishing drills MUST have written legal sign-off before you start. That means HR, Legal, and the relevant
councils or DPOs depending on the country.
Never run a phishing simulation without proper authorization — it is genuinely illegal in many jurisdictions without it.
--------------------------------------------------------------------------------------------------------
2. What You Need Before You Start
2.1 Legal and Organizational Prerequisites
Seriously, sort this out first. Before any server gets touched:
Written authorization from management, HR, and Legal — for every country employee you're targeting
A clear scope document spelling out who's being tested, when, and what scenario
Employee CSV files from HR (First Name, Last Name, Email, Position) — one per region, handled securely
2.2 Infrastructure Requirements
Microsoft Azure subscription with quota for:
2 Linux VMs, 1 Windows Server VM, 1 Application Gateway (Standard_v2 or WAF_v2), 1 Standard SKU Load Balancer, and Azure BastionDomain registrar account — we used Hostinger (more on this shortly)
Two domain names: one for the sender (email FROM address), one for the landing page link
Basic Linux command-line knowledge (SSH, systemctl, apt, editing files)
IT Admin coordination — get them to whitelist your sender IP and domain before campaigns go live
2.3 The Software Stack
GoPhish — the phishing simulation engine (free, open source)
Postfix — Mail Transfer Agent for actually sending emails
OpenDKIM — dedicated DKIM signing service wired into Postfix
Nginx — reverse proxy sitting in front of GoPhish
Certbot / Let's Encrypt — free SSL certificates
Ubuntu 24.04 LTS — OS for both the mail and web VMs
Windows Server 2022 — for the Jumpbox VM
Azure Application Gateway — public HTTPS endpoint with TLS termination
Azure Bastion — secure RDP/SSH access without any public IPs on VMs
Azure Standard Load Balancer — public static IP for the Postfix VM
--------------------------------------------------------------------------------------------------------
3. Architecture Overview
Before we touched a single server, we mapped out exactly how everything connects. This step saves you so much headache later — trust me. Here's what we built:
Traffic Flows at a Glance
Phishing emails: GoPhish (VM1) → Postfix relay (VM2) → Target mail server → Employee inbox
Employee clicks phishing link: Internet → Application Gateway (HTTPS) → Nginx (VM1 port 80) → GoPhish (port 8080) → Landing page
Admin access to GoPhish: Azure Bastion → Jumpbox RDP → Browser → VM1 private IP:3333
VM Roles
VM1 — GoPhish server + Landing page | No public IP (goes through Application Gateway) | GoPhish, Nginx, Certbot
VM2 — Postfix mail relay | Public IP via Load Balancer | Postfix, OpenDKIM
Jumpbox — Admin access via RDP | No public IP (via Azure Bastion) | Windows Server 2022, Browser
Why two VMs instead of one? Great question.
GoPhish can send email directly — but using it as its own mail server is unreliable for deliverability and harder to lock down. Separating the concerns means VM1 handles web/landing pages, and VM2 is a dedicated Postfix relay that only VM1 can talk to. If the sending IP ever gets blacklisted, you just replace VM2 without touching the GoPhish server. Clean separation, easy recovery.
--------------------------------------------------------------------------------------------------------
4. Domain Setup on Hostinger
4.1 Why Hostinger?
We chose Hostinger as our domain registrar because it's cheap, has a clean DNS interface, and supported the domain ( Because of Region constraints). We registered two domains — one for the sender (email FROM address) that points to VM2's Load Balancer IP, and one for the landing page links that points to the Application Gateway IP.
Fun fact: we originally started with GoDaddy and abandoned it. Their registration process was slower and more expensive. Hostinger had both domains live in under 15 minutes.
4.2 DNS Records We Added
For the sender domain — the one that goes in the email FROM address:

A record → @ → [POSTFIX-LB-PUBLIC-IP] — root domain points to your mail server IP
A record → mail → [POSTFIX-LB-PUBLIC-IP] — mail subdomain points to same IP
MX record → @ → mail.[SENDER-DOMAIN] (priority 10) — mail routing
TXT record → @ → v=spf1 ip4:[POSTFIX-LB-PUBLIC-IP] -all — SPF authorizes your IP to send
TXT record → _dmarc → v=DMARC1; p=quarantine; rua=mailto:dmarc@[SENDER-DOMAIN] — DMARC policy
TXT record → mail._domainkey → v=DKIM1; k=rsa; p=[DKIM PUBLIC KEY] — DKIM email signing
For the landing domain — the one in the phishing link:
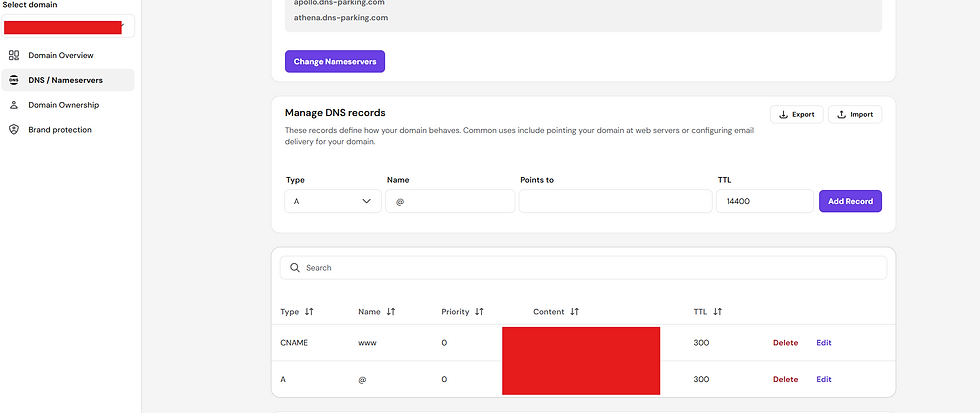
A record → @ → [APPLICATION-GATEWAY-PUBLIC-IP] — points to your Azure Application Gateway
DNS propagated in about 15-30 minutes on Hostinger. You can verify with:
nslookup [YOUR-DOMAIN]
# or
dig [YOUR-DOMAIN] A
dig mail._domainkey.[SENDING-DOMAIN] TXT
dig _dmarc.[SENDING-DOMAIN] TXT
--------------------------------------------------------------------------------------------------------
5. Azure Infrastructure Setup
5.1 Resource Group and Virtual Network
Everything lives in one Resource Group. Create it in your target Azure region. Then spin up a Virtual Network (VNet) with one subnet. All three VMs go into the same VNet so they can chat privately without any internet hop.
VNet address space: 172.*.*.*/*
Subnet: 172.*.*.*/*
All three VMs must be in this subnet for private IP communication
5.2 Public IPs — Here's Where People Get Confused
This trips up a lot of people with Azure, so let's be clear:
VM1 (the GoPhish/landing page server) has NO public IP.
It's completely private. The Application Gateway gets the public IP, terminates TLS (HTTPS), and forwards plain HTTP to the VM on its private IP. Way more secure — GoPhish is never directly exposed to the internet. If you need to test GoPhish before the Gateway is set up, you can temporarily assign a public IP to VM1, then remove it once the Gateway is ready.
VM2 (the Postfix mail relay) DOES have a public IP
— but through an Azure Standard Load Balancer, not directly on the NIC. Why a Load Balancer and not a direct public IP?
Two reasons: if you need to replace the VM later, the public IP stays (you just re-add the new VM to the backend pool). And the Standard Load Balancer lets you set a DNS name label on the public IP — which you need for PTR/RDNS, which mail deliverability depends on.
Important Azure gotcha: Standard Load Balancers do NOT allow outbound internet by default.
You'll need to add an outbound rule to let VM2 reach the internet on port 25 for sending mail.
5.3 Creating the VMs
VM1 — GoPhish + Landing Page Server:
OS: Ubuntu 24.04 LTS
Size: Standard B2s (2 vCPUs, 4 GB RAM)
Private IP: *
Public IP: None — access via Application Gateway (public) or Bastion (admin)
NSG: Allow port 22 from Jumpbox IP only; allow port 80 from Application Gateway subnet only; allow port 3333 from VNet only
VM2 — Postfix Mail Relay:
OS: Ubuntu 24.04 LTS
Size: Standard B2als v2 (2 vCPUs, 4 GB RAM)
Private IP: *
Public IP: via Azure Standard Load Balancer (static) — do NOT assign a public IP directly to the NIC
NSG: Allow port 25 inbound from VM1 private IP only; allow port 25 outbound to internet; allow port 22 from VNet for SSH
5.4 Setting PTR / RDNS on the Load Balancer Public IP
To set the PTR record, go to:
Azure Portal → Load Balancer public IP → Configuration → DNS name label → enter a label (e.g. your-mail-label). Azure sets the PTR to: [YOUR-IP] → your-mail-label.[region].cloudapp.azure.com.
Make your Postfix myhostname match this FQDN exactly (see Section 10).
5.5 SSH Between VMs
# On VM1, generate SSH key and copy public key to VM2
ssh-keygen -t ed25519 -f ~/.ssh/vm2_key
ssh-copy-id -i ~/.ssh/vm2_key.pub user@[VM2-PRIVATE-IP]

# Test SSH access from VM1 to VM2
ssh -i ~/.ssh/vm2_key user@[VM2-PRIVATE-IP]
--------------------------------------------------------------------------------------------------------
6. The Jumpbox VM — Why It Exists and How to Use It
6.1 The Problem: GoPhish Admin Panel is Localhost-Only
Here's the deal: by design, GoPhish binds its admin panel to 127.0.0.1:3333 — you can only reach it from the VM itself. VM1 has no public IP. So how do you actually use the GoPhish UI?
You've got two options:
Option A: SSH Tunnel (fine if you're comfortable on the command line)
ssh -L 3333:127.0.0.1:3333 user@[VM1-PRIVATE-IP] # Then open browser on your machine: https://localhost:3333
This tunnels port 3333 from VM1 through your SSH connection to your local machine. Works for solo use, but it's awkward for a team — you'd need to distribute SSH keys everywhere.
Option B: Jumpbox VM (what we built — much better for teams). A Jumpbox is a VM inside the same VNet as your other VMs. It has no public IP, but you access it via Azure Bastion — Microsoft's managed RDP/SSH gateway that runs inside Azure without exposing any port to the internet.
6.2 Setting Up the Jumpbox
Step 1: Enable Azure Bastion. In the Azure portal, go to your VNet → Bastion. Click Enable. Azure creates a dedicated AzureBastionSubnet (/27 minimum) and a Bastion host with its own public IP. Takes about 5-10 minutes.
Step 2: Create the Windows Server Jumpbox VM:
OS: Windows Server 2022 Datacenter
Size: Standard_B2s (2 vCPUs, 4 GB RAM)
Public IP: None — that's the whole point
VNet/Subnet: Same VNet as VM1 and VM2
NSG: No inbound internet rules needed — Bastion handles access
Step 3: RDP in via Azure Bastion. In the Azure portal, go to your Jumpbox VM → Connect → Bastion → enter your Windows admin credentials. Azure opens a browser-based RDP session.
No RDP client needed.
Step 4: Once inside the Jumpbox, open Edge or Chrome and go to:
https://[VM1-PRIVATE-IP]:3333
Accept the self-signed certificate warning (GoPhish uses a self-signed cert on the admin panel by default). You're in.
Why Windows for the Jumpbox?
A full GUI, Edge browser, and other admin tools all ready to go. For a pure SSH jumpbox to manage Linux VMs, Ubuntu works fine — but for accessing GoPhish's web UI, Windows is just easier.

--------------------------------------------------------------------------------------------------------
7. VM1: Installing and Running GoPhish
7.1 Download and Install GoPhish
SSH into VM1 and run:
cd /opt
sudo wget https://github.com/gophish/gophish/releases/download/v0.12.1/gophish-v0.12.1-linux-64bit.zip
sudo apt install unzip -y
sudo unzip gophish-v0.12.1-linux-64bit.zip -d gophish
sudo chmod +x /opt/gophish/gophish
7.2 Configure GoPhish
Edit the config file at /opt/gophish/config.json:
{
  "admin_server": {
    "listen_url": "localhost:3333",
    "use_tls": true,
    "cert_path": "certs/admin.crt",
    "key_path": "certs/admin.key"
  },
  "phish_server": {
    "listen_url": "0.0.0.0:8080",
    "use_tls": false,
    "cert_path": "example.crt",
    "key_path": "example.key"
  },
  "db_name": "sqlite3",
  "db_path": "gophish.db",
  "migrations_prefix": "db/db_",
  "contact_address": "",
  "logging": { "filename": "", "level": "" }
}
Key points to note:
the admin_server listens on localhost only — never expose this to the internet. The phish_server listens on 0.0.0.0:8080 — Nginx will proxy to this. The use_tls is false on the phish server because Nginx and the Application Gateway handle HTTPS termination. Double-TLS would break the proxy chain.
And heads up: after editing config.json, always do a full restart with sudo systemctl restart gophish. Reloading does not apply all config changes.
7.3 Generate Self-Signed Cert for Admin Panel
sudo mkdir -p /opt/gophish/certs
sudo openssl req -newkey rsa:4096 -nodes \
  -keyout /opt/gophish/certs/admin.key \
  -x509 -days 365 -out /opt/gophish/certs/admin.crt \
  -subj "/CN=gophish-admin"
7.4 Run GoPhish as a systemd Service
Create /etc/systemd/system/gophish.service:
[Unit]
Description=GoPhish Phishing Simulation
After=network.target

[Service]
Type=simple
User=root
WorkingDirectory=/opt/gophish
ExecStart=/opt/gophish/gophish
Restart=on-failure
RestartSec=5

[Install]
WantedBy=multi-user.target
sudo systemctl daemon-reload
sudo systemctl enable gophish
sudo systemctl start gophish
sudo systemctl status gophish7.5 First Login
On first run, GoPhish prints a temporary password in the logs. Grab it with:
sudo journalctl -u gophish -f | grep "Please login"Log in via the Jumpbox browser, accept the cert warning, use the temp credentials, and set a strong password immediately. Don't skip that step.
--------------------------------------------------------------------------------------------------------
8. Nginx as a Reverse Proxy
GoPhish runs on port 8080. Nginx sits in front on port 80 and proxies traffic to it. This also lets you serve static pages (like your awareness page) directly from Nginx without going through GoPhish.
sudo apt install nginx -yCreate /etc/nginx/sites-available/gophish:
server {
    listen 80;
    server_name [LANDING-DOMAIN];

    location / {
        proxy_pass http://localhost:8080;
        proxy_set_header Host $host;
        proxy_set_header X-Real-IP $remote_addr;
        proxy_set_header X-Forwarded-For $proxy_add_x_forwarded_for;
        proxy_set_header X-Forwarded-Proto $scheme;

        # Serve awareness page for any path GoPhish doesn't recognize
        error_page 404 =200 @awareness;
    }

    # Named location fix — must use this pattern
    location @awareness {
        root /var/www/html;
        try_files /awareness.html =200;
    }

    location /awareness {
        root /var/www/html;
        try_files /awareness.html =404;
    }
}
sudo ln -s /etc/nginx/sites-available/gophish /etc/nginx/sites-enabled/
sudo nginx -t
sudo systemctl reload nginxTwo critical things to know here:
First — do NOT add an HTTP-to-HTTPS redirect in Nginx when you're using an Azure Application Gateway. The Application Gateway terminates TLS and sends plain HTTP to port 80 on your VM. If Nginx redirects port 80 to HTTPS, you get an infinite redirect loop: Gateway → port 80 → Nginx 301 → HTTPS → Gateway → port 80 → repeat forever. It will drive you nuts.
Second — the error_page 404 =200 @awareness must use a named location (@awareness), not a direct file path. Using a file path causes Nginx's internal try_files logic to override the 200 status and return 404 anyway.
--------------------------------------------------------------------------------------------------------
9. SSL Certificate with Let's Encrypt
A trusted SSL cert on the landing domain is essential. If the browser shows a certificate warning, employees will immediately know something is off and the drill is blown.
sudo apt install certbot python3-certbot-nginx -yMethod 1 — Nginx plugin (use this if VM1 is temporarily accessible on port 80 before the Application Gateway is in place):
sudo certbot --nginx -d [LANDING-DOMAIN]Method 2 — DNS challenge (use this when VM1 has no public IP, which is our standard setup):
sudo certbot certonly --manual --preferred-challenges dns \
  -d [LANDING-DOMAIN]
Certbot will ask you to add a _acme-challenge TXT record to your domain in Hostinger. Add it, wait 30-60 seconds for propagation, then press Enter. The cert goes to /etc/letsencrypt/live/[LANDING-DOMAIN]/. Set up auto-renewal:
sudo systemctl enable certbot.timer
sudo systemctl start certbot.timer
systemctl list-timers | grep certbot
--------------------------------------------------------------------------------------------------------
10. VM2: Setting Up Postfix as a Mail Relay
Postfix on VM2 is a relay-only MTA. GoPhish submits mail to Postfix on port 25, and Postfix delivers it to the recipient's mail server.
Postfix never accepts mail from the internet — only from VM1's private IP. That's the whole security model here.
10.1 Install Postfix
sudo apt update
sudo apt install postfix -y
# When prompted: choose "Internet Site", enter your sender domain as the mail name
10.2 Harden Postfix
Edit /etc/postfix/main.cf:
myhostname = mail.[SENDER-DOMAIN]
mydomain = [SENDER-DOMAIN]
myorigin = $mydomain
inet_interfaces = all
inet_protocols = ipv4

# Only accept mail from VM1's private IP — this is critical
mynetworks = 127.0.0.0/8, [VM1-PRIVATE-IP]/32

# No local delivery — relay only
mydestination =
local_transport = error:local delivery disabled

# Strip the server banner — hides Postfix version from mail headers
smtpd_banner = $myhostname ESMTP

# TLS settings
smtp_tls_security_level = may
smtpd_tls_security_level = may

# Recipient restrictions — only permit from mynetworks, reject all else
smtpd_recipient_restrictions = permit_mynetworks, reject

# Rate limiting — prevent abuse if VM is compromised
anvil_rate_time_unit = 60s
smtpd_client_message_rate_limit = 200
smtpd_client_connection_rate_limit = 50

relayhost =
smtp_sasl_auth_enable = no
sudo systemctl restart postfix
sudo systemctl enable postfix
# Test from VM1 that it can reach VM2 on port 25
telnet [VM2-PRIVATE-IP] 25Azure port 25 heads-up:
Azure blocks outbound port 25 by default on new subscriptions to prevent spam. You need to submit a request to Microsoft to enable it. Go to the Azure portal → New support request → Subscription and billing → Subscription management → Enable outbound SMTP emails.
In our experience this took 24-48 hours to get approved.
10.3 DKIM Signing with OpenDKIM
Rather than relying on GoPhish's built-in DKIM, we use OpenDKIM as a dedicated Milter service wired into Postfix. This is the right production approach and gives you proper control over key management.
sudo apt install opendkim opendkim-tools -y

# Generate key pair
opendkim-genkey -s mail -d [SENDER-DOMAIN]
# Creates mail.private and mail.txt

# Store private key
sudo mkdir -p /etc/opendkim/keys/[SENDER-DOMAIN]
sudo mv mail.private /etc/opendkim/keys/[SENDER-DOMAIN]/mail.private
sudo chown opendkim:opendkim /etc/opendkim/keys/[SENDER-DOMAIN]/mail.private
sudo chmod 600 /etc/opendkim/keys/[SENDER-DOMAIN]/mail.private
Take the public key from mail.txt and add it as a DNS TXT record in Hostinger: Name = mail._domainkey.[SENDER-DOMAIN], Value = v=DKIM1; k=rsa; p=[YOUR-PUBLIC-KEY-HERE]
Wire OpenDKIM to Postfix by adding to main.cf:
smtpd_milters = inet:localhost:port
non_smtpd_milters = inet:127.0.0.1:port
milter_default_action = accept
sudo systemctl enable opendkim sudo systemctl start opendkim sudo systemctl restart postfix
10.4 Start VM2 Before Each Campaign
To save Azure costs, we deallocate VM2 between sessions. Just remember to start it in the Azure portal before any campaign send — it takes about 2-3 minutes to boot.
Postfix and OpenDKIM auto-start via systemd.
--------------------------------------------------------------------------------------------------------
11. Azure Application Gateway Configuration
The Application Gateway is the public HTTPS endpoint for the landing page. It receives internet traffic, terminates TLS, and forwards plain HTTP to VM1 on port 80. Here are the components you need to configure:
Frontend IP: Static public IP — this is your APPLICATION-GATEWAY-PUBLIC-IP
Backend Pool: VM1 private NIC IP
Backend HTTP Setting: Protocol HTTP, Port 80 — the AG sends plain HTTP to VM1
Health Probe: HTTP, path /, match status 200-404 — GoPhish returns 404 for unknown paths, so you MUST include 404 or the probe marks the backend unhealthy and stops forwarding
HTTP Listener: Port 80 — needed for plain HTTP and Certbot HTTP challenges
HTTPS Listener: Port 443 with SSL certificate — the AG handles TLS termination
Routing Rules: Both HTTP and HTTPS forward to the backend pool
11.2 Upload the SSL Certificate
Export the Let's Encrypt cert as a PFX file:
sudo openssl pkcs12 -export \
  -in /etc/letsencrypt/live/[LANDING-DOMAIN]/fullchain.pem \
  -inkey /etc/letsencrypt/live/[LANDING-DOMAIN]/privkey.pem \
  -out /tmp/landing-cert.pfx \
  -passout pass:[YOUR-PFX-PASSWORD]
Upload this PFX in the Azure portal under Application Gateway → Listeners → HTTPS Listener → Certificate.
--------------------------------------------------------------------------------------------------------
12. DNS and Email Authentication (SPF, DKIM, DMARC, PTR)
This is the most commonly skipped step — and it's exactly why most phishing simulation emails end up in spam. All four of these have to be configured correctly. Let's go through each one.
SPF (Sender Policy Framework)
SPF tells receiving mail servers which IPs are allowed to send email for your domain. Add this TXT record:
v=spf1 ip4:[POSTFIX-LB-PUBLIC-IP] -allUse -all (hard fail), NOT ~all (soft fail). The hard fail is required for inbox delivery to most corporate mail servers.
DKIM (DomainKeys Identified Mail)
DKIM adds a cryptographic signature to every outgoing email. The receiving server verifies it against the public key in DNS — confirming the email was sent by an authorized sender and wasn't modified in transit. If you're using OpenDKIM (recommended), add this DNS TXT record:
Name:  mail._domainkey.[SENDER-DOMAIN]
Value: v=DKIM1; k=rsa; p=[YOUR-PUBLIC-KEY-HERE]
DMARC
DMARC ties SPF and DKIM together and tells receivers what to do with failures:
Name:  _dmarc.[SENDER-DOMAIN]
Value: v=DMARC1; p=quarantine; rua=mailto:dmarc@[SENDER-DOMAIN]; adkim=r; aspf=r
PTR / Reverse DNS
Many mail servers (especially corporate ones) check that the sending IP's PTR record matches the hostname in the SMTP banner. Set the DNS name label on the Load Balancer's public IP, then set your Postfix myhostname to match that FQDN exactly.
Verify All Records
# SPF
nslookup -type=TXT [SENDER-DOMAIN]

# DKIM
nslookup -type=TXT mail._domainkey.[SENDER-DOMAIN]

# DMARC
nslookup -type=TXT _dmarc.[SENDER-DOMAIN]

# PTR
nslookup [POSTFIX-LB-PUBLIC-IP]
Use mxtoolbox.com for a visual check — it tells you exactly what passes and what fails. Also register your sender domain in Google Postmaster Tools to monitor sending reputation over time.
--------------------------------------------------------------------------------------------------------
13. Configuring GoPhish — Sending Profile, Templates, Landing Pages, Campaigns
13.1 Sending Profile
The Sending Profile tells GoPhish how to relay email. Go to Sending Profiles → New Profile:

Name: Anything descriptive
SMTP From: name@[SENDER-DOMAIN] — bare email address, NO display name here. Postfix rejects display names in MAIL FROM (e.g. "CERT <name@domain.de>" causes Postfix to produce invalid SMTP syntax). The display name goes in the email template's From field instead.
Host: [VM2-PRIVATE-IP]:25 — your Postfix relay on its private IP
Username / Password: Leave blank — Postfix accepts without auth from VM1's IP
Ignore Certificate Errors: Yes
Email Headers: Add a custom header to help IT identify drill emails — e.g. X-Company-Drill:1999 .
This header is critical: it enables the SCL = -1 whitelist rule and lets IT set up auto-responses when employees report the email.
13.2 Email Templates
Go to Email Templates → New Template. We created a realistic Microsoft-branded template. Effective scenarios include: Microsoft Unusual Sign-in Activity, IT helpdesk password expiry, HR payroll update, DocuSign signature request.

Key principles:
Subject: Creates urgency without being obvious — e.g. "Unusual sign-in activity on your Microsoft account"
From (display name): This is where the display name goes — e.g. "Microsoft Account Team <account-security-noreply@[SENDER-DOMAIN]>"
HTML Body: Include {{.URL}} as the phishing link — GoPhish replaces this with a unique tracking URL per recipient at send time. Include {{.Tracker}} for open tracking (1x1 pixel). Use {{.FirstName}} for a higher click rate.
Add Tracking Image: Check this box.
Create separate templates for each language — a Japan employee getting an email in perfect japanese is far more convincing than a translated English one.
13.3 Landing Pages
Go to Landing Pages → New Page:
Capture Submitted Data: Yes (to track who interacted)
Capture Passwords: NO — never capture real passwords in a phishing drill. Legally risky and unnecessary — you only need to know they would have submitted, not what password they would have used.
Redirect To: Your awareness page URL — e.g. https://[LANDING-DOMAIN]/awareness
HTML: Import from a site (GoPhish can clone any public webpage) or write custom HTML

13.4 Users and Groups (Target Lists)
Go to Users and Groups → New Group. Import a CSV with headers:

First Name,Last Name,Email,Position
John,Smith,j.smith@[TARGET-DOMAIN],Engineer
Create separate groups per region so you can run region-specific campaigns with language-appropriate templates. Always test with a small trusted group (1-5 people) before uploading the full employee list. Handle CSV files securely — delete from disk after import into GoPhish.
13.5 Campaigns
Go to Campaigns → New Campaign:

Name: Descriptive Wave 1
Email Template: Select the template for this region
Landing Page: Select your awareness landing page
URL: https://[LANDING-DOMAIN] — GoPhish automatically appends a unique per-recipient tracking token. The {{.URL}} variable in your template gets replaced with each recipient's unique link at send time.
Sending Profile: Your Postfix relay profile
Groups: Select the target group for this region
Launch Date: Schedule it — stagger by region 24-48 hours apart to manage helpdesk load
Send Emails By: Set a campaign window (e.g. 9 AM to 5 PM on working days) — GoPhish distributes sends evenly across this window automatically
13.6 Campaign Results Dashboard
GoPhish shows you real-time stats:

Sent — email delivered to the mail server
Opened — tracking pixel loaded (email was opened)
Clicked — recipient clicked the phishing link
Submitted Data — recipient filled in and submitted the form
Reported — recipient reported the email via your IT reporting button
You can export all results as CSV for analysis.
--------------------------------------------------------------------------------------------------------
14. Getting Whitelisted — The IT Admin Process
Even with perfect SPF/DKIM/DMARC, emails to corporate inboxes (Microsoft 365 / Exchange Online) will likely land in Junk unless you get whitelisted. This is actually correct behaviour — your phishing domain is new, unknown, and looks suspicious by design. Here's exactly what IT needs to do.
14.1 Two Steps — Both Are Required
Step 1 — EOP Connection Filter: IP Allow List: Microsoft 365 Admin Center → Security → Email & Collaboration → Policies & Rules → Threat Policies → Anti-spam → Connection filter policy (Default) → IP Allow List → Add [POSTFIX-LB-PUBLIC-IP].
This skips connection-level blocking — but Exchange still runs content and spam analysis after this.
That's why Step 2 is also mandatory.
Step 2 — Mail Flow Rule: Set SCL = -1: Exchange Admin Center → Mail flow → Rules → New rule.
Condition: Sender IP is in range [VM2-LB-PUBLIC-IP] OR sender domain is [SENDING-DOMAIN] OR message header X-[COMPANY]-PhishDrill = [YEAR]
Action: Set the spam confidence level (SCL) to -1
SCL = -1 bypasses ALL spam filtering and delivers directly to inbox. Set this rule at higher priority than any existing anti-phishing or anti-spam rules.
Why both steps?
The IP Allow List alone prevents connection-level rejection but does NOT bypass EOP content filtering or Microsoft Defender anti-phishing policies. The SCL = -1 mail flow rule is the only reliable way to guarantee inbox delivery.
14.2 For Corporate Mail Gateways (Non-Microsoft)
If your org uses a third-party gateway (Cisco IronPort, Proofpoint, Mimecast, etc.) in addition to or instead of EOP, that gateway also needs to whitelist your IP and domain. Raise a separate ticket with whichever team manages it, including the sender IP, sender domain, the custom X-header, and a reference to your security awareness programme authorization number.
14.3 Whitelist Ticket Template
When raising a ticket with IT, provide all of this in one message to avoid back-and-forth:
Subject: Whitelist Request — Security Awareness Phishing Drill

Please whitelist the following for our authorized phishing drill:

Sender IP:       [POSTFIX-LB-PUBLIC-IP]
Sender Domain:   [SENDER-DOMAIN]
Phishing Links:  https://[LANDING-DOMAIN]
Email Header:    X-Company-Drill: 1999

Required Actions:
1. Add [IP] to EOP Connection Filter → IP Allow List
2. Create mail flow rule:
   Condition: header X-Company-PhishDrill = 2026
   Action: set SCL = -1
--------------------------------------------------------------------------------------------------------
15. End-to-End Testing
Before you send a single email to a real employee, validate everything with a small trusted test group. Here's how to do it right.
15.1 Send a Test Email via GoPhish API
Here's a quirk worth knowing: the /api/util/send_test_email endpoint ignores {"template": {"id": 2}} — it does NOT look up the template from the database. You have to pass the full template JSON inline:
# Step 1: Fetch the full template object
TEMPLATE=$(curl -sk https://127.0.0.1:3333/api/templates/[TEMPLATE-ID] \
  -H "Authorization: Bearer [YOUR-API-KEY]")

# Step 2: Send test email with full template inline
curl -sk -X POST https://localhost:port/api/util/send_test_email \
  -H "Authorization: Bearer [YOUR-API-KEY]" \
  -H "Content-Type: application/json" \
  -d "{
    \"template\": $TEMPLATE,
    \"smtp\": {
      \"id\": 1,
      \"host\": \"[VM2-PRIVATE-IP]:25\",
      \"from_address\": \"name@[SENDER-DOMAIN]\",
      \"ignore_cert_errors\": true,
      \"headers\": [{\"key\": \"X-Company-PhishDrill\", \"value\": \"2026\"}]
    },
    \"email\": \"[YOUR-TEST-EMAIL]\",
    \"url\": \"https://[LANDING-DOMAIN]\"
  }"

15.2 Full Test Checklist
Email arrives in your test inbox (check both inbox and spam)
Email headers show SPF=pass, DKIM=pass, DMARC=pass
Custom header X-Company-PhishDrill: 2026 is present in raw source
Clicking the link in the email opens the landing page at https://[LANDING-DOMAIN]
Landing page loads over HTTPS with a valid certificate (padlock visible, correct domain)
The awareness page loads correctly after click
Back in GoPhish campaigns dashboard, the click event is recorded
GoPhish records Email Sent, Email Opened, Clicked Link, Submitted Data for the test recipient
PTR/RDNS verified: dig -x [VM2-LB-PUBLIC-IP] resolves to expected hostname
Test delivery to a corporate email address once IT whitelisting is confirmed active
15.3 Check Email Headers
In Gmail: click the three-dot menu on the email → "Show original". Look for:
Received-SPF: pass
Authentication-Results: dkim=pass; spf=pass; dmarc=pass
X-Company-Drill: 1999← your custom header confirming it's being added
--------------------------------------------------------------------------------------------------------
16. Common Issues and Fixes We Encountered
Let me save you some pain. Here are every problem we actually ran into and exactly how we got past each one.
Issue 1: Landing page shows ERR_TOO_MANY_REDIRECTS
Cause: Nginx was redirecting port 80 → HTTPS. The Application Gateway sends HTTP to port 80 after terminating TLS. The redirect creates an infinite loop.
Fix: Remove the HTTP→HTTPS redirect from Nginx. Both port 80 and 443 server blocks should serve content directly. The Application Gateway handles TLS before traffic reaches Nginx.
Issue 4: Direct test URL returns 404 even though nginx error_page is set
Cause: Using error_page 404 =200 /awareness.html triggers an internal redirect that hits the try_files fallback, which overrides the =200 status code.
Fix: Use a named location in Nginx:
error_page 404 =200 @awareness; location @awareness { root /var/www/html; try_files /awareness.html =200; }
Issue 2: GoPhish config changes don't take effect
Cause: After editing config.json, a SIGHUP or reload does not apply all changes.
Fix: Always do a full restart: sudo systemctl restart gophish.
Issue 3: Email goes to spam on Gmail (new domain)
Cause: Brand-new domain and IP with no sending history = zero reputation. This is expected and not a configuration error. SPF/DKIM/DMARC can all pass but Gmail's reputation filter still soft-blocks new senders.
Fix:
Set PTR/RDNS for the sending IP (Azure DNS label on the Load Balancer public IP)
Change SPF from ~all to -all
Register your sender domain in Google Postmaster Tools to monitor reputation
For corporate targets: it doesn't matter — the IT whitelist rule (SCL = -1) overrides spam scoring entirely
--------------------------------------------------------------------------------------------------------
17. Sending Strategy for Large Campaigns
Sending 3,emails all at once is a genuinely bad idea. It triggers spam filters, looks unnatural, can overwhelm a small Postfix server, and employees warn each other in Slack. Here's what we actually did.
17.1 Batch by Region, Not Blast
Separate campaign per region — allows localised templates and independent per-region reporting
Around 1,000 recipients per region
GoPhish has a built-in scheduler — set a campaign window (e.g. 9 AM to 5 PM on working days) and it automatically spaces the sends
Target approximately 200 emails/day per region — well within deliverability limits for a new domain
5-day campaign window per region
Stagger region launches by 24-48 hours — prevents helpdesk overload from simultaneous report spikes
17.2 Language-Specific Templates
Use native-language templates for each region. A employee receiving an email in perfect German is far more convincing than a translated English template. Build separate templates for countries
17.3 Scenario Realism
The best phishing scenarios mimic tools the target actually uses daily: Microsoft 365 login alerts, IT helpdesk notifications, HR payslip portals, shipping notifications. The more generic the scenario, the lower the click rate — which defeats the whole point of the drill.
17.4 Brief the IT Helpdesk in Advance
Give the helpdesk the auto-response text to send back to employees who report the suspicious email:
17.5 Key Metrics to Report After the Drill
These four numbers tell you exactly where additional training investment is needed and give you a measurable baseline for next time:
Open rate — % of employees who opened the email
Click-through rate — % who clicked the phishing link
Submission rate — % who interacted with the landing page
Reporting rate — % who reported the suspicious email to SOC/Incident Team
--------------------------------------------------------------------------------------------------------
Key Takeaways
The two-VM architecture (GoPhish + Postfix separated) is way more robust and maintainable than cramming everything onto one server.
Azure Application Gateway is the right tool when your VM has no public IP — it handles TLS cleanly and keeps the GoPhish server off the internet entirely.
The Jumpbox is essential for accessing GoPhish's localhost-only admin panel without exposing it. The custom X-header is what makes the IT whitelist rule reliable and gives you a unique signal to auto-respond to employee reports.
And legal sign-off is non-negotiable — get it in writing before you touch a single config.Got questions or hit a different issue? Drop a comment below — happy to help troubleshoot.
----------------------------------------------Dean-------------------------------------------------


Comments