

Azure Logging Part 2 — Storage Accounts, NSG Flow Logs, and the Data Exfiltration Trail

If the previous article covered the logs you are likely to find turned on when you arrive at a scene, this one covers the logs you need but probably will not find. NSG flow logs, storage account access logs, and the forensic trails for tracking data exfiltration — all off by default. That means you either find them already configured or you turn them on immediately and accept that prior activity may be gone forever.
The good news:
when these logs were configured, they hold some of the most specific, actionable evidence in Azure.
Network flow data can reconstruct attacker movement.
Storage access logs can confirm exactly which files were read, downloaded, or deleted.
Understanding how to find, enable, and interpret these logs is what separates a complete Azure investigation from one that goes cold.
Azure Storage: The Context You Need Before the Logs
Storage accounts appear everywhere in Azure investigations — not just as a log destination but as actual evidence sources and frequently as the exfiltration target itself. Before jumping into storage logs, it is worth understanding how Azure storage works at a level that makes the forensic implications clear.
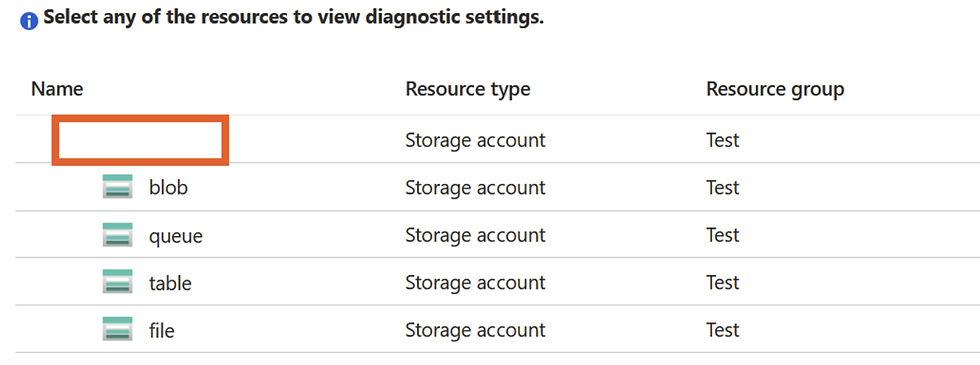
Four Types of Azure Storage
Blob — Binary Large Object storage. Used for unstructured data: images, videos, documents, and especially logs. Most relevant type for investigations.
File — A distributed file share accessible via SMB protocol, similar to a Windows file share.
Queue — A message queue service for storing and retrieving messages between application components.
Table — NoSQL table storage, now part of Azure Cosmos DB. This is where VM operating system logs (WAD) are stored.
Blob Storage: How It Works
Blob stands for Binary Large Object. Any file type can be stored in a blob container — making it ideal for large volumes of log data and, unfortunately, for staging stolen data before exfiltration.
Three types of blobs:
Block Blobs — Used for text and binary data. Can store up to 4.75TB (preview supports up to 190.7TB). This is what most logs are stored as.
Append Blobs — Optimized for append-only operations. Ideal for logging data since entries are always added to the end.
Page Blobs — Used for random-access files up to 8TB. This is the format for virtual hard disk (VHD) files — so when you download a VM disk snapshot, it comes as a page blob.
Every storage account has a globally unique
URL: https://accountname.blob.core.windows.net.
This means any blob can be accessed directly over the internet using that URL and the correct credential. That is not just a technical detail — it is a data exfiltration vector.
Storage Account Access: Keys, SAS, and the Public Access Problem
Storage accounts come with two access keys by default. These keys grant full access to everything in the storage account. The reason there are two is operational — you can rotate one while the other stays active.
A better approach is Shared Access Signatures (SAS). An SAS is a time-limited credential granting specific, restricted access to specific storage resources. It can be scoped as narrowly as a single blob file with read-only access for the next 24 hours. SAS tokens expire automatically.


The worst option — and surprisingly common — is enabling public access on a blob container.
This allows anyone on the internet to read data without any credential at all. This has led to numerous breach incidents where organizations accidentally exposed sensitive data in publicly accessible Azure blob containers.
💡 Investigator Note: During any Azure investigation, run a check for publicly accessible blob containers. Navigate to each storage account and check the 'Public access level' setting on each container. This is a quick win that frequently reveals unintentional data exposure.
Checking for Key Enumeration
When investigating a storage account that may have been accessed by an attacker, one of the first things to check is whether any keys were recently listed.
In the Activity Log, look for this specific operation:
AzureActivity
| where OperationNameValue == "MICROSOFT.STORAGE/STORAGEACCOUNTS/LISTKEYS/ACTION"
| project TimeGenerated, CallerIpAddress, Caller, ResourceId
| order by TimeGenerated desc
LISTKEYS events from an unfamiliar IP address or account strongly indicate an attacker obtained access credentials and could have subsequently exfiltrated data from that storage account.
Storage Account Logs: Finding the Exfiltration Evidence
Knowing that access keys were listed does not prove data was actually taken. To confirm exfiltration, you need storage account access logs — specifically the StorageRead log that records every read operation against blob data.
Critical problem:
StorageRead logs are disabled by default. If your client did not enable them before the incident, there is no record of data being read. An attacker could have downloaded gigabytes of data and left absolutely no trace in Azure native logs.
Enabling Storage Account Logs
Storage account logging is configured through Diagnostic Settings. Two options:
Diagnostic Settings (preview) — The newer, recommended approach. Allows granular configuration for each storage type (blob, queue, table, file) separately. Can send logs to a Log Analytics workspace, a different storage account, an event hub, or a partner solution.
Diagnostic Settings (classic) — The older approach. Still functional but being phased out.

For each storage type, you can enable logging for Read, Write, or Delete operations individually. The relevant one for data exfiltration is Read. Be selective — in high-traffic environments, enabling Read logging for all blob containers generates enormous log volume and significant storage costs.
💡 Investigator Note: Microsoft's Threat Matrix for Storage Services maps specific MITRE ATT&CK techniques applicable to Azure storage including data exfiltration. It is a useful reference for building detection logic around storage access patterns.
Tracing Data Exfiltration: The GetBlob Operation
Once StorageRead logs are enabled, every file downloaded from a blob container generates a log entry with the operation type GetBlob. To search for exfiltration evidence:
StorageBlobLogs
| where OperationName == "GetBlob"
| where TimeGenerated > ago(7d)
| project TimeGenerated, CallerIpAddress, Uri, StatusCode
| order by TimeGenerated desc
Look for bulk GetBlob operations from an unfamiliar IP, particularly if they occur shortly after a LISTKEYS event. The Uri field tells you exactly which files were accessed.
Enforcing Storage Logging at Scale with Policies
Manually enabling storage logging on every storage account is impractical for large organizations. A better approach is Azure Policy to enforce logging on all storage accounts — existing and future — at the management group or subscription level.
There is no out-of-the-box predefined policy for forcing storage account logging, but custom policies can be written. The policy can send storage logs to an event hub. Note: the event hub must be in the same region as the storage account, so you may need one per region.

If you are doing a proactive engagement or post-incident hardening review, recommend storage logging policies as a priority item. It is one of the highest-value configurations for future investigations.
NSG Flow Logs: Your Network-Level Investigation Record
let us cover how to set them up, what they contain, and how to use them for investigation.
What NSG Flow Logs Capture
Layer 4 visibility — IPs, ports, and protocols. Not application-layer content.
One-minute intervals — Fixed, cannot be changed.
JSON format — Consistent with all other Azure logs.
One-year default retention — Longer than most other Azure log sources.
5-tuple per record — Source IP, source port, destination IP, destination port, protocol — plus the traffic decision (Allow or Deny) and in Version 2, throughput data (bytes and packets).
Setting Up NSG Flow Logs: Three Steps
Step 1: Enable Network Watcher — Must be enabled per region. If VMs are deployed in East US, West Europe, and Southeast Asia, you need Network Watcher in all three. Do not miss a region.
Step 2: Register the Microsoft.Insights provider — Must be registered in each subscription that will use flow logs.
Step 3: Enable NSG flow logging — Navigate to the specific NSG, configure flow log Version 2 (strongly recommended over Version 1 — Version 2 adds throughput data), and specify the storage account destination.
💡 Investigator Note: Version 2 is the critical choice here. Version 1 only tells you whether traffic was allowed or denied. Version 2 also tells you how much data was transferred. For exfiltration investigations, knowing throughput is often the difference between confirming and merely suspecting data was moved.


Traffic Analytics: Visualizing the Flow Data
Raw NSG flow logs in JSON format are useful but not the fastest way to spot anomalies. Traffic Analytics is a feature built on top of Log Analytics that processes flow log data and provides visual insights.
Traffic Analytics can:
Visualize network activity across all Azure subscriptions on a world map
Identify security threats such as known malicious IPs and unusual traffic patterns
Show traffic flow patterns between resources
Highlight network misconfigurations like unused NSG rules or overly permissive rules
From an investigation standpoint, Traffic Analytics is particularly useful for quickly identifying unexpected external connections — C2 communications, exfiltration destinations, and lateral movement paths — without writing raw KQL queries against JSON flow data.
📌 Old: Traffic Analytics was previously a premium feature with additional cost. ➜ Updated: As of 2023, Traffic Analytics pricing changed to be based on data processed, billed per GB. The first 1GB per month is free. Factor the cost into logging strategy recommendations for high-traffic environments.
Azure Storage Explorer: The Investigator's Download Tool
Azure Storage Explorer is a free graphical desktop application from Microsoft that lets you browse and download blobs, tables, and file shares from Azure storage accounts. It is the simplest way to get logs out of Azure without writing code.
During an investigation, you will use Storage Explorer to:
Navigate to the storage account holding archived logs
Download log blobs (PT1H.json files) for offline analysis
Access Windows Azure Diagnostics tables for VM event logs
Download Cloud Shell Linux container contents such as .bash_history
Download VM disk snapshots (VHD files) for forensic analysis
Quick reference of the log blob names you will encounter most frequently:
insights-logs-auditlogs — Tenant audit logs (directory changes)
insights-logs-signinlogs — User sign-in logs
insights-logs-noninteractiveusersigninlogs — Non-interactive sign-in logs
insights-activity-logs — Subscription activity logs
insights-logs-networksecuritygroupevent — NSG events
insights-logs-networksecuritygroupflowevent — NSG flow logs (your network traffic records)
The PT1H.json naming convention means one file per hour. For a seven-day investigation window, you will be dealing with 168 hourly files per log type. Tools in various DFIR toolkits can merge these into a single JSON file for easier analysis.
In the next article, we go inside the virtual machines themselves — covering Windows event logs, Linux syslog, and application logs collected through Azure's diagnostic agent.
----------------------------------------------------------------------------------------------------------Special Thanks
I would like to extend my heartfelt gratitude to one of my dearest friends, a Microsoft Certified Trainer, for her invaluable assistance in creating these articles. Without her support, this would not have been possible. Thank you so much for your time, expertise, and dedication!
-------------------------------------------------------------------------------------------------------------


Comments