

Understanding the “Remediate Threats” Tab in Sublime Security
- Aug 11, 2025
- 4 min read
Updated: Aug 12, 2025

The Remediate Threats section in Sublime Security is a powerful place to review and take action on suspicious or malicious emails.
It's organized into multiple sub-tabs designed to help SOC analysts or IT security teams streamline email threat response.
Let’s walk through each part, focusing on the Flagged tab — which shares similar structure and logic with the User Reports tab.
Remediate Threats Tab Breakdown
The tab is divided into the following parts:

📌 Flagged
Emails automatically flagged by Sublime's detection engines.
All Unreviewed
Attack Surface Reduction
Auto-Reviewed
Auto-Remediated
🧑💼 User Reports
Emails reported by users manually (similar to "Flagged", so we'll skip this in detail as the layout is the same).
Flagged > All Unreviewed

When Sublime flags an email, it shows up under “All Unreviewed”. This is where analysts start their review process.
🧠 Key Elements of the Email Detail View
Clicking on a flagged email expands a panel containing all related data. Here's what you see:

✅ Verdict
Sublime's classification (e.g., Malicious, Spam, etc.).In our example, the email was marked Malicious.

📊 Attack Score Signals
This section shows why Sublime determined the message to be malicious.

📬 Message Group Details
Details include:
Subject
Sender
Recipients
Who opened the email, replied to email.
Whether it was forwarded

🕵️ Message Insights
This section summarizes key indicators such as:
First-time sender domain/email
Low reputation links
Mismatched links
Unsolicited sender
Brand logos used in the email
Domains in body and headers
Sender’s timezone offset
Sender prevalence (e.g., new or known)

📑 Message Content
This area shows a preview of the email as seen by the user — essential for understanding how convincing the phishing attempt was.

You can also:
Download the .eml file for deeper forensics or sandboxing.
📧 Sender Details
Shows reputation history and authentication status:
Email: chrome@servicealerts.net
Past reviewed messages: 0
First Seen: New to your organization
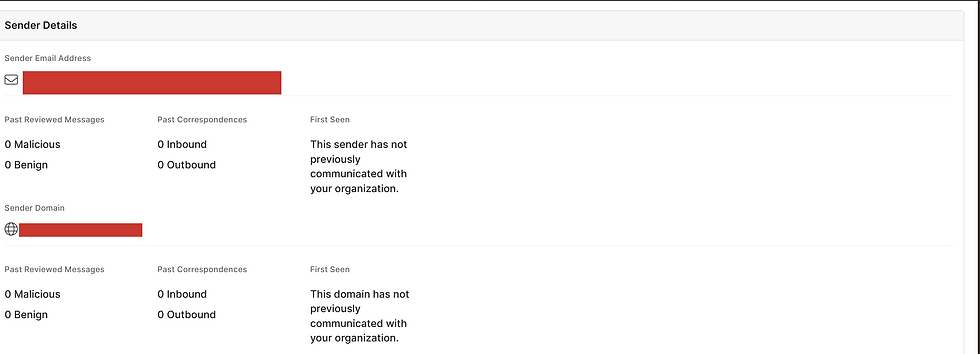
Authentication:
SPF: ❌ Failed
DKIM: ✅ Passed
DMARC: ❌ Failed

📜 Message Activity History
This timeline shows all events related to the message:
Open timestamps
Forwarding trail
Full recipient list and their actions

👨⚖️ Review Status
You can take manual actions from here:
Select classification: Malicious, Spam, Graymail, Benign, or Simulation
Action Taken: e.g., Quarantine, Allow, etc.
If you issue Quarantine it will remove the email from all users group (How awesome is that)

-----------------------------------------------------------------------------------------
I will show you another example of email than we move next
Email

Mail details:

Analysis details: (Which rules triggered the alert:)

Message group details

Message details:

Message content:

Sender details and authentication:

Message activity history:

Review status basically for you

-----------------------------------------------------------------------------------------
Lets moved to next tab which is ASR (Attack surface reduction:
Attack Surface Reduction (ASR)
ASR is Sublime’s way of proactively reducing exposure to attacks before they happen — much like hardening an endpoint.
🧬 What is ASR?
ASR uses custom MQL (Mail Query Language) rules to detect and block abnormal or suspicious behaviors. Examples include:
type.inbound
and any(attachments,
        .file_type in $file_extensions_common_archives
        and any(file.explode(.),
                any(.scan.javascript.identifiers, strings.ilike(., 'ActiveXObject', 'ShellExecute'))
                or (
                  length(.scan.javascript.strings) > 0
                  and all(.scan.javascript.strings, strings.ilike(., 'Shell.Application', '*.exe'))
                )
        )
)
and (
  profile.by_sender().prevalence in ("new", "outlier")
  or profile.by_sender().any_messages_malicious_or_spam
)
and not profile.by_sender().any_messages_benign
This rule flags messages when Javascript contains identifiers or strings that may attempt to execute files.
📥 What You’ll See
Alerts generated by ASR rules will appear under this tab.

You can set ASR rules in “alert-only” mode or configure automatic actions such as: (I will do not recommend i will give you better method later- than you can decide which method you want to use and proceed with )

Quarantine
Move to Trash
Insert Warning Banner
Webhook Trigger
Slack Notification


This allows teams to enforce strict hygiene policies on Microsoft 365 or Google Workspace — reducing phishing and BEC risk significantly.
-----------------------------------------------------------------------------------------
Lets talk about third tab called Auto reviewed

Auto-Reviewed – Let the Platform Handle the Obvious
If you're overwhelmed by flagged emails that are obviously spam or benign, Auto-Review is your best friend.
What is Auto-Review?
It’s an action you can assign to high-confidence rules. When triggered, it will:
Automatically classify the message (e.g., spam, malicious, benign)
Mark it as “auto-reviewed”
Hide it from your default triage view (unless you explicitly go to the Auto-Reviewed tab)
How to Set It Up
Open a specific detection rule.

Click Edit or Edit Metadata.

Add the Auto-review action.
Choose a classification like:
Malicious
Unwanted (Spam or Graymail)
Simulation

Save the rule.
Or Else
Go to detection rules-> Selection which ever detection you want i will choose BEC for now->

Selection which ever detection you want i will choose BEC for now--> Click On view all

Select all rule--> Click on Action--> Select Auto review--> And select classification

Why It Matters
Say you’ve built a rule that’s great at catching marketing spam. Instead of manually reviewing those every day, enable Auto-review and classify them as Graymail. It keeps your analyst queue clean and focused on true threats.
Auto-Review Hierarchy
If multiple rules try to classify the same message, the platform uses this order of priority:
Simulation > Benign > Malicious > Spam > GraymailSo if one rule tags it as Simulation and another as Malicious, Simulation wins.
-----------------------------------------------------------------------------------------
Last tab Auto-Remediated
Here you will see Emails automatically taken action upon using predefined automation rules.

-----------------------------------------------------------------------------------------
✅ Final Thoughts
Sublime Security’s Remediate Threats section helps you:
Investigate flagged emails deeply
Reduce noise with auto-review
Proactively block risky patterns using ASR rules
Give end users a way to report threats easily
With a mix of automation and human oversight, it's a powerful way to stay ahead of phishing and email-based threats.
----------------------------------------------Dean--------------------------------------------------
Upcoming Article : Let’s Talk About Detection Rules in Sublime Security (EDR for Email!)
-----------------------------------------------------------------------------------------------------


Comments